DIY NICHROME HEATERS
This information is provided for those with the proper electrical knowledge to build 12 Volt telescope dew heaters using Nichrome wire. If you do not have such knowledge then you should build heaters using 330 Ohm resistors. These heaters can produce almost twice the required watts of heat so they must be used with a controller to regulate the amount of heat. They are intended to be used with a 13.8VDC Power Supply or 12V Battery (13.8V when fully charged), higher voltage will overheat and damage them, lower voltage may not produce enough heat. I will offer no advice on modifying these heaters for other voltages or applications, try searching the internet for alternate heater plans.
Mark Kaye's instructions for building heaters with Nichrome wire cover the construction details but leave it up to the builder to determine the electrical aspects such as minimum wire length and desired resistance value (Ohms) for your particular telescope or eyepiece. The instructions below will insure the wattage is consistent with a commercial heater of the same size and allows using a mix of Nichrome heaters, 330 Ohm resistor heaters, and commercial heaters. These instructions assume you are familiar with my instructions for building heaters with 330 Ohm resistors, if not you should review them first for general concepts. This page only covers aspects of Nichrome wire, refer to my building heaters with 330 Ohm resistors and Mark Kaye's instructions for information on how to assemble the heaters.
Building Nichrome Wire Dew Heaters
Building Nichrome wire heaters involves calculating the desired resistance and then using parallel lengths of Nichrome wire to obtain that resistance. You can obtain Nichrome wire out of an old blow dryer, toaster, heating pad, etc. It can also be purchased from companies such as Jacobs. Do not cut any pieces of Nichrome wire until you get to step 7. These instructions deal with very low resistance values so it is important to subtract the resistance in the ohmmeter leads from the reading on the meter. Touch the meter leads together to measure the lead resistance. Subtract this lead resistance from every measurement taken in the following instructions. For example if touching the leads together reads 0.5 ohms, then a piece of Nichrome wire that reads 15.0 ohms is really only 14.5 ohms. It is also important to understand that the smaller the wire gauge (diameter) the higher the resistance (Ohms) per Foot. So if you have several different gauges the smallest gauge will allow shorter lengths for the heater wire.
- Measure the circumference of what you want your heater to fit in inches. For example a C11 measures 38 inches.
- Divide 190 by the inches of circumference to determine the desired heater resistance.
In this example: 190 / 38 inches = 5.0 Ohms
(Why 190? Because this ratio produces 0.76 Watts per inch of circumference when operated at 12 Volts, matching the wattage of similar commercial heaters.) - Without cutting the Nichrome wire, stretch it out and use alligator clips or some other means of temporarily applying 12 Volts to the full length of the wire (make sure it's over 30" long). Assuming the Nichrome barely gets warm, move one alligator clip a few inches closer to shorten the portion of wire the 12 volts is being applied to. Keep moving it closer until you find a point that feels very warm but not hot enough to melt anything that contacts the Nichrome wire (be careful not to burn yourself, the wire may take a few minutes to reach its maximum temperature). In the above example I found that 30 inches was the shortest piece I could use without it getting too hot. We do not want the wire to melt the heater strip or any part of the telescope. The shorter we cut a given piece of Nichrome wire the hotter it will get because the shorter the wire the less resistance it has and the more current flows through the wire. Now that we know the minimum length of wire, as long as the wires are this length or longer the wire will not get too hot.
- Remove power from the Nichrome wire and touch the meter leads to the places on the Nichrome wire where the alligator clips were placed in step 3 to measure the resistance of the minimum length of Nichrome wire. In this example the 30 inch length of Nichrome wire read 14.0 ohms.
- Divide the minimum Nichrome wire ohms (step 4) by the desired heater resistance (step 2) which in this example was 2.8. Increase the result to the next higher whole number (do not round downward) which in this example was 3. This is the number of pieces of Nichrome wire you will have to cut, but we do not know the length so do not cut any Nichrome yet.
- Multiply the desired heater resistance (step 2) by the number of pieces of Nichrome wire we will be cutting (step 5). In our example, 5.0 ohms times 3 pieces equals 15.0 ohms.
- Connect an ohmmeter lead to one end of the Nichrome wire, then move the other meter lead along the nichrome wire to find the length of Nichrome wire with the desired resistance (step 6). Cut the wire a little longer and you can trim it later. In our example, a 32 inch length of Nichrome gave the desired 15.0 ohms so we cut 3 pieces of Nichrome wire 33 inches long and the length will be shortened to 32 inches when the terminals are installed.
- Slide each piece of Nichrome wire into heat shrink (such as Mouser 5174-11161) to prevent the wires from touching themselves or any other wires. Test the heater by applying 12V to the heater (as in step 3) for 10 minutes to insure it does not melt the material.
NOTE: If the nichrome wire is difficult to get through the heat shrink tubing, first run a small diameter copper wire through the tubing, then twist the nichrome and copper wires together and use the copper wire to pull the nichrome through the heat shrink tubing. - Solder will not stick to Nichrome so you must use crimp terminals to connect the nichrome to your copper wires. Common electrical ring terminals work well. Twist the nichrome and copper wires together then insert into terminal and crimp. After crimping, you may solder the connections for even better contact.
- Construct your heaters so that the Nichrome wires distribute the heat evenly along the length of the heater as shown below (if portions of the heater contain more the nichrome than other parts you will have hot spots). Also make sure that no wires can make electrical contact with each other and short out.
The next step determines the minimum length that any piece of Nichrome wire can be cut. If the Nichrome is shorter than this minimum it has too little resistance so too much current flows and the wire overheats. The wire can be longer because this increases resistance so less current flows and the heat is reduced.
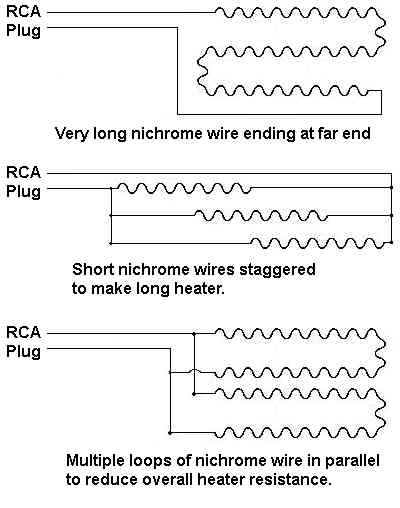
- If you only have one long Nichrome wire it can be looped back and forth as shown in the first illustration. If there is an odd number of passes, use a copper wire to connect the end of the Nichrome to the opposite end of the heater strip where the wire to the RCA plug attaches. The copper wire should be covered in heat resistant material so it won't melt and touch the nichrome wire.
- If the Nichrome wires are shorter than the length of your heater then you can stagger the Nichrome wires and connect them with copper wires as shown in the second example.
- If several parallel Nichrome wires are used and they are longer than the heater length, then you can put the loops side by side as shown in the third example.